Solar lights have become a popular choice for outdoor lighting, offering an eco-friendly and cost-effective solution for illuminating pathways, gardens, and public spaces. At the heart of every solar light lies its rechargeable battery, which stores the energy collected by the solar panel during the day and powers the light at night. These batteries play a critical role in the performance and reliability of solar lights, yet they often go unnoticed until the light starts to dim or fail altogether.
One common question I hear is, “Is it worth replacing the battery in my solar light?” The answer is a resounding yes. Replacing the battery not only restores the light’s performance but also extends its lifespan, saving you money in the long run. It’s a sustainable choice that reduces waste and keeps perfectly functional solar lights out of landfills. Many people worry about the cost or complexity of replacing batteries, but with the right guidance, it’s a straightforward process that anyone can handle.
This article serves as a practical guide to help you identify when your solar light’s battery needs replacement, choose the right type of battery, and replace it step by step. I’ll also share tips on maintaining your batteries to ensure long-lasting performance. By replacing failing batteries instead of discarding the entire light, you not only save money but also contribute to a more sustainable future. Let’s dive into the details and empower you to keep your solar lights shining brightly for years to come.
Table of Contents
ToggleIdentifying the Need for Battery Replacement
Knowing when to replace the battery in your solar light is essential for maintaining its performance and extending its lifespan. Batteries are the lifeblood of solar lights, and recognizing the signs of failure early can save you time, money, and frustration. Let’s explore how to identify when a battery replacement is necessary and when it might not be the solution.

Signs of Battery Failure
Your solar light often communicates its issues through performance changes. Paying attention to these signs can help you pinpoint battery problems before they escalate.
-
The Light Does Not Turn On at Night
If your solar light fails to illuminate after a full day of sunlight, the battery may no longer hold a charge. This is one of the most common indicators of battery failure, especially if the solar panel appears to be functioning properly. -
The Light Operates for a Significantly Shorter Time Than Before
A healthy battery should power your solar light throughout the night. If the light dims or shuts off after just a few hours, the battery’s capacity has likely degraded. This is especially common in older NiCd or NiMH batteries. -
The Light Is Dim or Flickers
Flickering or dim light output often signals inconsistent power delivery from the battery. This could be due to internal wear or a failing connection within the battery compartment. -
The Solar Panel Appears Intact, but Performance Remains Weak
If the solar panel is clean and positioned correctly but the light still underperforms, the battery is likely the culprit. Solar panels rarely fail outright, so weak performance often points to a battery that can no longer store sufficient energy.
Checking Battery Type and Status
Before replacing the battery, it’s important to identify the correct type and assess its current condition. This ensures compatibility and prevents unnecessary replacements.
-
Locating the Battery Compartment
Most solar lights have a battery compartment located on the underside of the light or near the solar panel. Use a screwdriver to open the compartment carefully, taking note of how the battery is positioned. -
Identifying the Specific Battery Chemistry
Check the label on the battery to determine its chemistry—common types include Nickel-Cadmium (NiCd), Nickel-Metal Hydride (NiMH), and Lithium-ion. Each type has unique characteristics, so replacing it with the same chemistry is crucial for optimal performance. -
Determining the Required Voltage and Capacity (mAh)
The battery label will also indicate its voltage (e.g., 1.2V, 3.7V) and capacity (measured in milliampere-hours, or mAh). Match these specifications exactly when purchasing a replacement to ensure compatibility with your solar light. -
How to Test the Battery Using a Multimeter
If you’re unsure whether the battery is failing, use a multimeter to test its voltage. A fully charged battery should read close to its rated voltage. If the reading is significantly lower, the battery may no longer hold a charge and needs replacement.
When Not to Replace the Battery
Sometimes, replacing the battery won’t solve the problem. In these cases, it’s better to address the root cause or consider replacing the entire light.
-
Visible Damage to the Solar Panel or Circuit Board
If the solar panel is cracked or the circuit board shows signs of burning or damage, the issue lies beyond the battery. Replacing the battery in this situation won’t restore functionality. -
Extensive Water Damage or Corrosion Inside the Casing
Water intrusion can corrode internal components, including the battery compartment and wiring. If you find significant rust or water damage, replacing the battery is unlikely to fix the problem. Instead, focus on improving the light’s waterproofing or consider upgrading to a more durable model.
By carefully identifying the need for battery replacement and understanding when it’s not the solution, you can make informed decisions that save time and money. Treat your solar light like a trusted partner—listen to its signals, and it will reward you with reliable performance for years to come.
Selecting the Correct Replacement Battery
Choosing the right replacement battery for your solar light is not just about grabbing the first one that fits—it’s about ensuring compatibility, performance, and longevity. A mismatched or low-quality battery can compromise your solar light’s efficiency and even damage its internal components. Let’s break down the key factors to consider when selecting the perfect replacement.

Understanding Battery Specifications
Every solar light relies on specific battery specifications to function properly. Ignoring these details can lead to poor performance or even permanent damage to the light’s circuitry.
-
Voltage Matching (e.g., 1.2V, 3.2V, 3.7V)
Voltage is the lifeblood of your solar light’s circuit. Using a battery with the wrong voltage can overload the system or fail to provide enough power. For example, if your light requires a 3.2V battery and you install a 3.7V one, the higher voltage could damage the circuit board. Always check the battery compartment or the old battery’s label to confirm the required voltage. -
Capacity (mAh) Requirements
The capacity of a battery, measured in milliampere-hours (mAh), determines how long your solar light can run on a full charge. A higher capacity means longer runtime, but it must fit the light’s design. For instance, upgrading from a 600mAh to an 800mAh battery can extend runtime, but going too high may not provide additional benefits if the solar panel can’t fully charge it. -
Physical Size and Form Factor (e.g., AA, AAA, 18650)
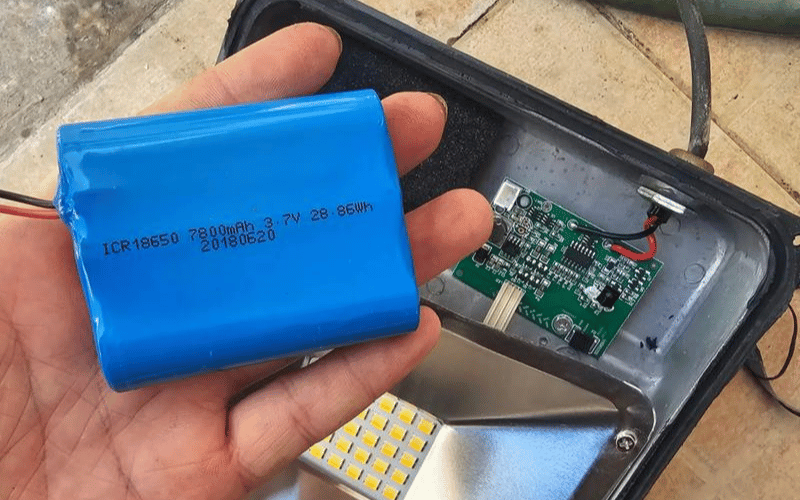
Batteries come in various sizes and shapes, such as AA, AAA, or cylindrical 18650 cells. Even if the voltage and capacity match, the battery must physically fit into the compartment. Double-check the dimensions and form factor before purchasing to avoid frustration during installation.
Choosing the Right Chemistry
The type of battery chemistry you choose impacts the performance, safety, and lifespan of your solar light. Each chemistry has its strengths and ideal use cases.
-
Nickel Metal Hydride (NiMH) vs. Nickel Cadmium (NiCd)
NiMH batteries have largely replaced NiCd in modern solar lights due to their higher capacity, environmental safety, and lack of toxic cadmium. If your light currently uses NiCd, consider upgrading to NiMH for better performance and sustainability. However, ensure your solar light’s charging system is compatible with NiMH before making the switch. -
Lithium Iron Phosphate (LiFePO4)
LiFePO4 batteries are the gold standard for high-power solar lights, such as streetlights or lanterns. They offer excellent thermal stability, a long lifespan of up to 2,000 charge cycles, and consistent performance in extreme temperatures. If your solar light requires a lithium-based battery, LiFePO4 is a reliable choice. -
Why Rechargeable Batteries Are Essential
Solar lights are designed to work with rechargeable batteries. Using standard alkaline batteries can damage the charging circuit and lead to leakage. Always opt for rechargeable batteries specifically designed for solar applications to ensure safe and efficient operation.
Where to Buy Replacement Batteries
Finding the right replacement battery doesn’t have to be a challenge. Knowing where to look can save you time and ensure you get a high-quality product.
-
Specialty Electronic Stores
Local electronic stores often carry a range of rechargeable batteries, including NiMH, NiCd, and lithium options. These stores are a great place to find batteries with specific voltage and capacity requirements. -
Online Retailers Offering Bulk Options
Online platforms like Amazon, eBay, or specialty battery retailers provide a wide selection of solar-compatible batteries. Search for terms like “batteries for solar lanterns” or “solar path light batteries” to narrow down your options. Buying in bulk can also save money if you have multiple solar lights. -
Searching for Specific Solar Light Batteries
Many manufacturers and retailers offer batteries specifically labeled for solar lights. These are often pre-tested for compatibility and performance, making them a convenient and reliable choice.
By understanding battery specifications, choosing the right chemistry, and knowing where to shop, you can confidently select a replacement battery that keeps your solar lights running efficiently. Treat your solar light’s battery like its heartbeat—choose wisely, and it will keep your light shining brightly for years to come.
How to Replace Solar Light Batteries Safely
Replacing the battery in your solar light is a straightforward process, but doing it safely and correctly ensures your light continues to perform at its best. Batteries are the heart of your solar light, and handling them with care not only protects the light but also keeps you safe. Let’s walk through the essential safety precautions, a detailed step-by-step process, and common mistakes to avoid.

Safety Precautions
Before diving into the replacement process, take a moment to prepare and ensure safety. A few simple precautions can prevent accidents and protect your solar light from unnecessary damage.
-
Turn Off the Light or Cover the Solar Panel
Always turn off the light or cover the solar panel with a cloth to stop it from charging while you work. This prevents any accidental electrical discharge and ensures a safer replacement process. -
Use Simple Tools and Follow Anti-Corrosion Best Practices
Gather basic tools like a small screwdriver and a soft cloth. If you notice corrosion on the battery contacts, have a cotton swab and a bit of white vinegar or baking soda solution ready to clean them. Avoid using excessive force when handling the light’s components to prevent damage.
Step-by-Step Replacement Process
Replacing the battery involves a few careful steps. Follow this guide to ensure a smooth and safe process.
-
Locate the Screws or Clips Holding the Housing Together
Inspect your solar light to find the screws or clips securing the battery compartment. These are often located on the underside of the light or near the solar panel. Use a screwdriver to loosen the screws or release the clips gently. -
Carefully Remove the Protective Covers Without Damaging Internal Wiring
Once the housing is open, handle the covers with care to avoid pulling or damaging the internal wiring. Keep the screws or clips in a safe place to avoid losing them. -
Note the Existing Battery Orientation (Positive and Negative Terminals)
Before removing the old battery, please take a moment to observe its orientation. The positive (+) and negative (-) terminals must align correctly with the contacts in the compartment. Snap a quick photo if needed to ensure you remember the correct placement. -
Remove the Old Battery and Check for Corrosion
Gently remove the old battery. Inspect the battery compartment for any signs of corrosion or residue. If you find corrosion, clean the contacts using a cotton swab dipped in white vinegar or a baking soda solution. Wipe the area dry with a soft cloth. -
Insert the New Battery Securely, Confirming Polarity
Place the new battery into the compartment, ensuring the positive and negative terminals align correctly with the contacts. Push the battery in securely but gently to avoid damaging the contacts. -
Test the Switch Function Before Closing the Housing
Turn the light on to confirm the new battery is functioning correctly. If the light doesn’t turn on, double-check the battery orientation and ensure the contacts are clean and secure. -
Re-Seal the Housing to Maintain Waterproof Integrity
Once you’ve confirmed the light is working, carefully reattach the protective covers and tighten the screws or clips. Ensure the housing is sealed tightly to prevent water or dust from entering the compartment.
Common Mistakes to Avoid
Even a simple process like battery replacement can go wrong if you overlook key details. Avoid these common mistakes to ensure a successful replacement.
-
Using the Wrong Battery Type or Voltage
Always use a battery that matches the specifications of your solar light. Installing a battery with the wrong voltage can damage the circuit or reduce performance. -
Ignoring Waterproofing After Replacement
Failing to properly seal the housing after replacing the battery can lead to water intrusion, which may corrode internal components and shorten the light’s lifespan. -
Overlooking the Need for Proper Disposal of Old Batteries
Never throw old batteries in the trash. Take them to a local recycling center or a designated battery disposal facility to ensure they are handled safely and sustainably.
By following these steps and avoiding common pitfalls, you can replace your solar light batteries safely and effectively. Treat your solar light with care during this process, and it will reward you with reliable performance and extended longevity.
Maintenance Practices to Maximize Battery Life
The battery is the heart of your solar light, and like any vital organ, it needs proper care to function at its best. By following specific maintenance practices, you can significantly extend the life of your solar light’s battery and ensure consistent performance. Let’s explore the steps you can take to keep your batteries healthy and your solar lights shining brightly.
Initial Charge Requirements
The first charge sets the foundation for your battery’s performance and longevity. Skipping this step or doing it incorrectly can lead to underperformance right from the start.
-
Allow 24 to 48 Hours of Uninterrupted Sunlight for the Initial Full Charge
When you first install your solar light, give the battery a full charge by exposing it to 24 to 48 hours of direct sunlight. This initial charge helps the battery reach its full capacity and ensures it operates efficiently from day one. Avoid using the light during this period to allow the battery to store as much energy as possible. -
Place the Light in an Optimal, Unobstructed Location
Position the solar light in a location that receives maximum sunlight throughout the day. Avoid areas with shade from trees, buildings, or other obstructions, as these can reduce the charging efficiency and prevent the battery from reaching its full potential.
Routine Maintenance
Routine care is essential to keep your solar light’s battery in top condition. A little effort goes a long way in preventing issues and maintaining performance.
-
Clean Solar Panels Regularly to Maximize Light Absorption
Dust, dirt, and debris can accumulate on the solar panel, blocking sunlight and reducing charging efficiency. Clean the panel with a soft cloth and water every few months, or more frequently in dusty environments. Avoid using abrasive materials that could scratch the surface. -
Protect the Light from Extreme Temperatures
Batteries are sensitive to temperature extremes. Prolonged exposure to high heat can accelerate degradation, while freezing temperatures can limit charging and discharging capabilities. If you live in an area with harsh weather, consider storing your solar lights indoors during extreme conditions or using models designed for temperature resilience, such as those with LiFePO4 batteries. -
Check and Clean Battery Contacts Periodically
Corrosion on battery contacts can disrupt the flow of electricity and reduce performance. Inspect the battery compartment every six months and clean the contacts with a cotton swab dipped in white vinegar or a baking soda solution if you notice any buildup. Wipe the area dry before reinserting the battery.
Battery Longevity Tips
Understanding how batteries age and how to care for them can help you get the most out of your investment. These tips will ensure your batteries last as long as possible.
-
Understand Cycle Life and Expected Lifespan (Typically 2 to 4 Years)
Most solar light batteries have a cycle life of 500 to 1,000 charge-discharge cycles, which translates to 2 to 4 years of use under normal conditions. Keep track of your battery’s age and performance, and plan for replacements when you notice reduced runtime or dimmer light output. -
Replace All Batteries in Systems That Use Multiple Batteries at the Same Time
If your solar light uses multiple batteries, replace all of them simultaneously. Mixing old and new batteries can cause uneven charging and discharging, which may damage the system or reduce overall performance. -
Avoid Deep Discharges to Prolong Battery Life
Deep discharges—where the battery is completely drained—can significantly shorten its lifespan. To prevent this, ensure your solar light receives adequate sunlight daily to keep the battery charged. If you notice the light dimming or shutting off early, check the placement and clean the solar panel to improve charging efficiency.
By following these maintenance practices, you can maximize the life of your solar light’s battery and enjoy consistent, reliable performance. Think of your battery as a partner in sustainability—treat it with care, and it will reward you with years of dependable service.
Quick Tips for Replacing and Maintaining Solar Light Batteries
Replacing and maintaining solar light batteries doesn’t have to be complicated, but it does require attention to detail. A few simple steps can make a big difference in ensuring your solar lights perform reliably and last longer. Here’s a checklist of actionable tips to guide you through the process.
Confirm the Battery Type, Voltage, and Capacity Before Purchasing
Before buying a replacement battery, double-check the specifications of your solar light. Look for the battery type (e.g., NiMH, NiCd, or LiFePO4), voltage (e.g., 1.2V, 3.2V, or 3.7V), and capacity (measured in mAh). These details are usually printed on the old battery or inside the battery compartment. Using the wrong type or voltage can damage the light’s circuitry or reduce its efficiency.
Use High-Quality Rechargeable Batteries for Better Performance
Not all rechargeable batteries are created equal. Invest in high-quality batteries from reputable brands to ensure consistent performance and a longer lifespan. For example, LiFePO4 batteries are ideal for high-power solar lights due to their stability and durability, while NiMH batteries are a great choice for smaller garden lights. Avoid using standard alkaline batteries, as they are not designed for solar charging and can leak or damage the system.
Re-Seal the Housing After Replacement to Prevent Water Damage
After replacing the battery, take the time to properly re-seal the housing. Ensure all screws or clips are tightened securely, and check that any gaskets or seals are intact. A poorly sealed housing can allow water to enter, leading to corrosion and damage to the internal components. If the seals appear worn or damaged, replace them to maintain the light’s waterproof integrity.
Regularly Clean the Solar Panel to Ensure Efficient Charging
A clean solar panel is essential for efficient charging. Dust, dirt, and debris can block sunlight and reduce the amount of energy stored in the battery. Clean the panel with a soft cloth and water every few months, or more frequently in dusty or pollen-heavy environments. Avoid using abrasive materials or harsh chemicals that could scratch the panel’s surface.
Replace Batteries Promptly When Performance Declines
Don’t wait for your solar light to stop working completely before replacing the battery. If you notice the light dimming, flickering, or operating for shorter periods, it’s time to replace the battery. Prompt replacement prevents strain on the system and ensures your light continues to perform at its best.
By following these quick tips, you can keep your solar lights running efficiently and extend the life of their batteries. Think of your solar light as a partner in sustainability—give it the care it needs, and it will reward you with reliable, eco-friendly illumination for years to come.
Frequently Asked Questions (FAQs)
Q: How often should I replace solar light batteries?
A: Replace solar light batteries every 2 to 4 years, depending on the type of battery and usage conditions. NiMH and NiCd batteries typically last 2 to 3 years, while LiFePO4 batteries can last up to 4 years or more. Monitor your light’s performance, and replace the battery promptly if you notice dimming, flickering, or reduced runtime.
Q: Can I use a higher mAh-rated battery than the original?
A: Yes, you can use a higher mAh-rated battery as long as the voltage matches the original. A higher mAh rating provides longer runtime, but ensure the battery physically fits in the compartment and that the solar panel can fully charge it during the day. Avoid going excessively high, as it may not offer additional benefits if the panel’s charging capacity is limited.
Q: What happens if I use the wrong type of battery in my solar light?
A: Using the wrong type of battery can damage your solar light’s circuitry or reduce its performance. For example, installing a standard alkaline battery instead of a rechargeable one can lead to leakage and system failure. Always match the battery type, voltage, and capacity specified by the manufacturer to avoid these issues.
Q: Is it expensive to replace solar light batteries?
A: Replacing solar light batteries is generally affordable. NiMH and NiCd batteries cost around $2 to $5 each, while LiFePO4 batteries may range from $10 to $20 depending on capacity. Investing in high-quality batteries ensures better performance and longer lifespan, making it a cost-effective choice in the long run.
Q: How do you dispose of old solar light batteries safely?
A: Take old solar light batteries to a local recycling center or a designated battery disposal facility. Many hardware stores and electronic retailers also offer battery recycling programs. Avoid throwing batteries in the trash, as improper disposal can harm the environment and pose safety risks.
Q: Do solar lights stop charging in cloudy weather?
A: Solar lights can still charge in cloudy weather, but the efficiency drops significantly. Overcast skies reduce the amount of sunlight reaching the solar panel, which may result in shorter runtimes at night. To maximize charging, place your solar light in the brightest possible location, even on cloudy days.
Conclusion
Replacing solar light batteries offers a cost-effective way to restore performance and extend the life of your lights. By following safe replacement practices and maintaining the new battery with regular cleaning and proper care, you can ensure reliable operation for years to come. Regular maintenance and timely battery replacement not only save money but also reduce waste, making your solar lights a sustainable lighting solution. Take a moment to evaluate your solar lights today, and replace batteries as needed to keep them shining brightly while contributing to a greener future.


