Is your solar light dimming prematurely or failing to stay on through the night? The prospect of replacing the battery naturally raises questions about maintenance and longevity. However, the data is encouraging: most high-quality solar light batteries are designed to last for several years before needing attention. With proper care, extended manufacturer warranties, and cost-effective alternatives to replacing the entire fixture, maintaining your solar lighting system is easier than you might think. Here are the key points to understand and anticipate this possibility with peace of mind.
Solar lights are an eco-friendly and cost-effective way to illuminate outdoor spaces, but, like any battery-powered device, their energy-storage components eventually degrade. Understanding the lifecycle of these batteries is crucial for maintaining optimal performance. While the idea of battery replacement might seem daunting to some, it is often a simple process that can significantly extend the life of your lighting investment.
This guide will cover everything you need to know about maintaining your solar lighting system. We will explore the specific triggers that indicate it’s time for a change, walk you through the replacement process step-by-step, and break down the associated costs. By understanding the signs of wear and knowing how to address them, you can ensure your solar lights continue to shine brightly for years to come, maximizing both their environmental benefits and your financial savings.
When Should You Change the Battery?
The Three Triggers for Replacement
|
Indicator |
Critical Threshold |
Recommended Action |
|---|---|---|
|
State of Health (SoH) |
Below 70 to 75% |
Plan for replacement |
|
Loss of Runtime |
-30% compared to the original |
Professional diagnosis required |
|
Visible Damage |
Corrosion or leakage |
Immediate replacement required |
In 85% of cases, a modern solar battery works perfectly for 2 to 5 years, depending on the chemistry and usage.
The State of Health (SoH) deserves a detailed explanation. This indicator measures the remaining storage capacity compared to the original specification. For example, a new 2000mAh battery that now only stores 1500mAh has an SoH of 75% (1500 ÷ 2000 × 100). This objective measurement determines the optimal time to consider replacement. Most users experience daily inconvenience below 70%, with the light failing to last through the night, making replacement necessary for reliable use. When capacity drops this low, the battery cannot store enough energy from the day’s sunlight to power the LED through the darkness, leading to early shutoffs.
Environmental factors play a significant role in accelerating this degradation. Batteries exposed to extreme heat often degrade faster than those in moderate climates, as high temperatures accelerate chemical reactions inside the cell. Similarly, freezing temperatures can temporarily reduce capacity, but repeated cycling in extreme cold can cause permanent damage over time.
To measure battery health without specialized equipment, observe the light’s performance after a full day of clear, direct sunlight. If the light turns off significantly earlier than it did when new—for instance, lasting only 4 hours instead of 8—it is a strong indicator that the capacity has dropped below the critical threshold. For those with a multimeter, checking the battery voltage after a full charge can also provide clues; a battery that fails to reach its rated voltage (e.g., 3.7V for Li-ion or 3.2V for LiFePO4) after charging is likely nearing the end of its life. Recognizing these signs early allows you to plan for a replacement before the light fails, ensuring your pathways and gardens remain safely illuminated.
Manufacturer Warranties That Protect You
|
Component |
Typical Duration |
Maximum Cycles |
Capacity Threshold |
|---|---|---|---|
|
Lithium (LiFePO4) |
3-5 years |
1,500-2,000 cycles |
70% |
|
Lithium-ion |
2-3 years |
500-1,000 cycles |
70% |
|
Lead-Acid |
1-2 years |
300-500 cycles |
60% |
|
NiMH (Garden) |
1 year |
500 cycles |
N/A |
These warranties often require replacement of the battery at no cost if capacity falls below the defined threshold during the warranty period. Diagnosis during the warranty period is usually free or handled via customer support troubleshooting. Meticulous preservation of purchase records and proof of installation date is essential for these warranties to apply.
It is important to note that warranties vary significantly between consumer-grade garden lights and commercial-grade street lighting systems. While a cheap path light might have a limited 1-year warranty covering defects only, professional solar street lights often come with comprehensive performance guarantees. These stronger warranties reflect the higher quality of components used, such as LiFePO4 batteries, which are known for their durability.
Some manufacturers may require evidence that the light was installed in an appropriate location receiving adequate sunlight, as improper installation can lead to battery sulfation or undercharging, conditions often excluded from warranty coverage. Keeping a log of when you purchased the lights and any maintenance performed—such as cleaning the panels—can be invaluable when filing a claim. In the event of a premature failure, these warranties can save you high costs, turning what would otherwise be a replacement expense into a simple customer service interaction.
Warning Signs to Watch For
Beyond SoH, several symptoms require special attention. Charging times that seem much longer despite full sun often indicate a failure of internal cells or increased internal resistance. A runtime drop exceeding 30% in colder months, beyond normal seasonal reduction, signals advanced degradation. Flickering lights, inconsistent operation despite adequate sunlight, or the inability to turn on at all justify immediate professional diagnosis for more complex, high-powered systems.
Differentiating between a battery issue and other problems is crucial. For instance, if the solar panel is covered in heavy dust, bird droppings, or shaded by new tree growth, the battery won’t charge fully regardless of its health. Before assuming the battery is dead, ensure the panel is clean and receiving direct sunlight. If the panel is clean and in the sun, but the performance remains poor, the battery is the primary suspect.
Visible signs of physical degradation are also critical warning signs. If you open the battery compartment and see white powder (corrosion) on the terminals, a swollen or bloated battery case, or any leaking fluid, these are immediate red flags. Swelling is widespread in failing lithium-ion batteries and poses a safety risk; these should be removed and disposed of immediately at a recycling center.
Field experience confirms the robustness of current batteries in proper conditions. Modern LiFePO4 batteries used in quality street lights often retain their original capacity well beyond their warranty periods. However, environmental stress—such as prolonged heatwaves exceeding 40°C (104°F) or deep freezes—can accelerate wear. Watching for these warning signs allows you to intervene before a complete system failure occurs, ensuring that your security or landscape lighting remains functional when you need it most.
Best Practices to Maximize Battery Life
Maximizing battery life relies on established practices. Keeping the solar panel clean and free of debris can double its lifespan, compared to a dirty panel that struggles to charge. A clean panel ensures the battery receives a full, healthy charge daily, preventing it from sitting in a partially discharged state, which is detrimental to chemistry like lead-acid and NiMH. Manufacturers unanimously recommend installing lights in areas that receive at least 6-8 hours of direct sunlight to ensure optimal charging cycles.
Avoiding deep discharges is another critical practice. Many modern solar lights come equipped with intelligent controllers that manage energy output. Using innovative modes, such as dimming or motion sensing, can significantly extend battery cell life by reducing the depth of discharge (DoD) each night. For example, a light that runs at 30% brightness and jumps to 100% only when motion is detected puts far less strain on the battery than one running at 100% all night. This shallower discharge cycle dramatically increases the total number of cycles the battery can endure.
Temperature management is also key. While you cannot change the weather, you can influence how it affects your lights. If you live in an area with severe winters and have portable solar garden lights, storing them indoors during the coldest months can prevent battery damage. For fixed installations, ensuring the battery housing is not directly exposed to scorching afternoon sun helps keep internal temperatures within a safe range.
Finally, the quality of replacement batteries matters. When the time comes, investing in high-quality replacements from reputable brands rather than the cheapest available option ensures better performance and longevity. Cheap batteries often overstate their capacity and lack proper safety circuitry. By following these simple maintenance and usage habits, you can effectively double the operational lifespan of your solar light batteries, maximizing value and reducing electronic waste.
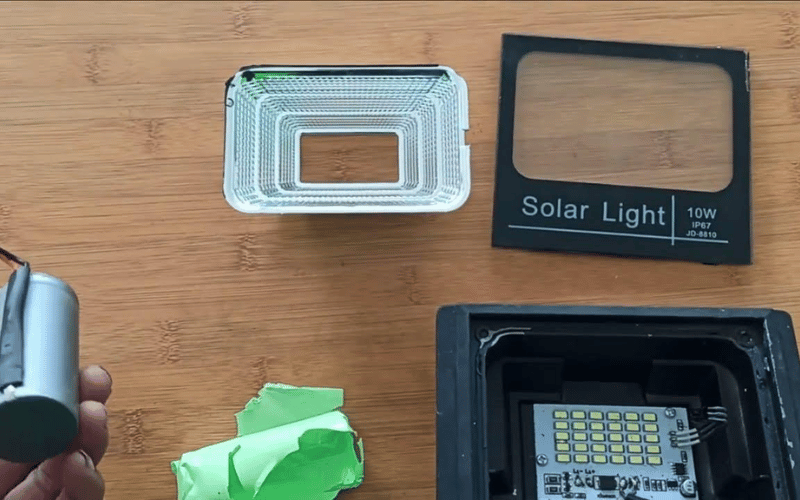
How to Change the Battery?
The 6 Steps of the Replacement Protocol
Replacing a solar light battery follows a simple protocol that most homeowners or maintenance staff can easily perform. The complete procedure typically takes between 5 and 15 minutes per unit, depending on the model’s complexity.
Step 1: Identify and Purchase (5-10 minutes of research): Before starting, check the manual or open the battery compartment to identify the specific battery type (e.g., AA NiMH, 18650 Li-ion, or a specific lead-acid block). Note the voltage (V) and capacity (mAh or Ah). Purchase a replacement that matches these voltage specifications exactly; capacity can be equal to or slightly higher than the original for longer runtime.
Step 2: Safety Prep (1 minute): Safety is critical but straightforward. Ensure the light is turned off. If the switch isn’t accessible, covering the solar panel with a cloth or placing the unit face down prevents the system from generating current while you work. For larger street lights, ensure the primary power connection is disconnected.
Step 3: Accessing the Housing (2-5 minutes): Locate the battery compartment. On garden lights, this is often on the underside of the solar cap. On street lights, it may be a separate box or integrated into the fixture. Use a screwdriver (usually Phillips head) to carefully remove the cover. Be mindful of rubber seals or gaskets—these are vital for waterproofing and must be preserved.
Step 4: Swapping the Battery (2-5 minutes): Gently remove the old battery. If it is a plug-in pack, unplug the connector carefully—do not pull by the wires. Insert the new battery, ensuring correct polarity (+ to +, – to -). If using a connector, it should click into place. Inspect the contacts for corrosion; if present, clean them with a bit of vinegar or lemon juice on a cotton swab before installing the new battery.
Step 5: Reassembly (2 minutes): Replace the battery cover, ensuring the waterproof seal is seated correctly to prevent moisture ingress. Tighten screws firmly, but do not over-tighten, which could crack the plastic housing.
Step 6: Validation and Testing (24 hours): Turn the switch to the “on” position. Place the light in full, direct sunlight for at least 24 hours (some manufacturers recommend 48 hours) to allow the new battery to reach a full initial charge before its first night of operation. This conditioning charge helps calibrate the battery for maximum performance.
Important Note: Always follow the specific guidelines provided by your light’s manufacturer. Using an incorrect battery type (e.g., putting a standard alkaline battery in a solar light) can damage the light and void any remaining warranty.
How Much Will It Cost?
Detailed Prices by Battery Type
|
Category |
Battery Type |
Typical Capacity |
New Price |
Refurbished/Bulk Price |
|---|---|---|---|---|
|
Garden & Path Lights |
NiMH (AA/AAA) |
600-2000 mAh |
$10 – $20 (4-pack) |
$5 – $10 (bulk) |
|
Spotlights & Wall Lights |
18650 Li-ion |
2000-3000 mAh |
$20 – $50 (pack) |
$15 – $30 |
|
Security Floodlights |
Lithium (LiFePO4) |
6-12 Ah |
$30 – $80 |
$25 – $60 |
|
Street Lights |
Lead-Acid / Gel |
20-50 Ah |
$50 – $120 |
$40 – $90 |
The price trend is encouraging. The cost per watt-hour, a key industry indicator, has dropped significantly over the past decade. Projections suggest this trend will continue, making battery replacements even more affordable. This aligns the cost of maintaining a solar light with the low price of standard household maintenance.
Cost Factors and Alternatives
When considering costs, several factors come into play. Brand-name batteries often command a premium but offer reliable capacity ratings and safety features. Generic batteries can be cheaper but may degrade faster. Capacity also influences price; a 3000mAh battery will cost more than a 1500mAh one, but it offers longer nightly runtime, which may be worth the investment for security lighting.
Alternatives to Buying New
- Modular Repair: For larger battery packs composed of multiple cells shrink-wrapped together, tech-savvy users can sometimes replace just the faulty individual cells if they have spot-welding tools. However, this is generally not recommended for novices due to safety risks.
- Refurbished Batteries: Some specialized retailers offer refurbished LiFePO4 packs for larger solar applications. These are tested to ensure they hold a specific capacity and can be a cost-effective, eco-friendly choice.
- Fixture Upgrades: In some cases, if a solar light is ancient (5+ years), the solar panel efficiency and LED brightness may be outdated. The cost of a high-quality replacement battery might be close to that of a brand-new, modern fixture that includes a new battery, a better solar panel, and brighter LEDs. Weighing the cost of the battery against a complete upgrade is a smart financial move.
Ultimately, replacing the battery is almost always cheaper than replacing the entire unit, especially for mid- to high-end solar lights. It reduces electronic waste and revives your lighting performance for a fraction of the cost of a new system.
Innovations That Change the Game
LFP Batteries Disrupt the Market
LFP (Lithium Iron Phosphate) batteries are already transforming established standards for solar lighting. Their 30 to 50% longer lifespan compared to traditional NMC (Nickel Manganese Cobalt) chemistries fundamentally changes the economic equation for replacement. These batteries can tolerate thousands of charge cycles, making them ideal for the daily demands of solar applications. Many LFP batteries are rated for over 2,000 cycles, translating to 5-8 years of reliable performance.
Beyond durability, the 20 to 30% lower cost and elimination of controversial cobalt make this chemistry particularly attractive. LFP batteries better resist extreme temperatures, a crucial advantage for outdoor lighting that must endure scorching summers and freezing winters. They also have virtually no risk of thermal runaway—a common concern with other lithium chemistries—which significantly improves safety for residential and public installations. Many leading solar street light manufacturers have already standardized LFP across their product ranges.
Solid-State Batteries: The Announced Revolution
Solid-state batteries represent the next technological breakthrough for the late 2020s. The promised characteristics could completely redefine standards: a doubled energy density would enable smaller, lighter lights with the same runtime, or much longer autonomy from the same-size pack. A projected lifespan reaching 10-15 years for an outdoor product could make battery replacement virtually obsolete for the average fixture’s lifetime.
Major technology and automotive companies are investing heavily in this area. While initial applications will likely be in electric vehicles and consumer electronics, the technology will eventually trickle down to applications like solar lighting. If these promises materialize, the already low maintenance of solar lighting will drop even further, making it an even more compelling choice for long-term, sustainable infrastructure.
The Circular Economy Creates Value
The second life of solar light batteries is generating a thriving new market. Packs retaining 70 to 80% of their capacity are no longer suitable for demanding lighting applications but are perfect for stationary storage. These used batteries can find a second use for 5 to 10 years in home energy storage systems, off-grid cabins, or powering small electronics. For example, a collection of old solar light batteries could be combined to create a power bank for charging phones or running a small fan during a power outage.
Recycling is also achieving remarkable performance. Advanced hydrometallurgical processes can now recover up to 95% of critical materials like cobalt and nickel from lithium-ion batteries. Lithium recovery rates are also improving, now reaching over 80% in some facilities. This closed-loop system reduces the environmental footprint of battery production by decreasing the need for new mining and minimizing waste. Companies like Redwood Materials and Li-Cycle are industrializing these processes, creating a sustainable supply chain for the future of battery technology. As regulations on battery disposal become stricter, these recycling efforts will become integral to the solar lighting industry.
Specialized Networks Democratize Repair
The growth of solar lighting has led to the emergence of independent specialized networks offering repairs and components that are 30 to 50% cheaper than manufacturer-direct prices, often with comparable guarantees. Companies and online communities dedicated to DIY solar projects have created a market for individual components like BMS (Battery Management System) boards, replacement cells, and custom battery packs. Their ability to source alternative parts and industrialize small-scale refurbishment creates healthy competition, driving prices down.
This structuring of the repair market directly contributes to cost reduction and sustainability. Instead of disposing of a light with a single faulty component, users can now find the exact part they need online. Increasing volumes of standardized batteries, such as the popular 18650 and 32650 cell formats, enable substantial economies of scale. Repair techniques are refined and shared in online forums, reducing intervention times and making repairs accessible to a wider audience. This expertise is spreading, multiplying the number of individuals and small businesses capable of practical, affordable intervention.