I see people worry about wasting money when replacing the LED bulb in a solar light. I understand their concerns. I have also felt uncertain before.
Yes, you can replace a solar light LED bulb, and it often makes sense to do so. Many solar lights use replaceable bulbs that restore the system’s performance at a low cost.
I am Nicole, co-founder and sales director of Sigolight. I have over 10 years of experience working on outdoor solar lighting projects. In most cases, I find that a simple bulb swap breathes new life into a solar fixture. In the paragraphs below, I will share more details on why replacing a solar light bulb is worthwhile, what to know when doing so, and how I approach these projects to help clients worldwide.
Is It Worth Replacing LED Bulbs in Solar Lights?
Some people assume replacing a solar light’s LED bulb might cost too much. Others think it might be too tricky or might not extend the fixture’s lifespan. I had similar doubts in my early years.
Replacing solar light LED bulbs is usually worth it. The bulb often accounts for a small fraction of the total system cost, making replacement highly affordable.
I have seen many solar lighting projects at different scales. Small garden lamps need only a simple bulb swap to work for many years. Large streetlights sometimes need more planning, but the principle remains the same. Most of the system—like the solar panel, the battery, and the housing—can last for a decade or more. The LED is a durable component, but it can fail. So why waste the entire fixture if you only need to change one part?
Factors That Determine the Feasibility of LED Bulb Replacement
I have spoken with many distributors, project managers, and homeowners. The question often comes down to feasibility. Is it possible, and does it make sense to invest time and money into a replacement?
|
Solar Light Type |
LED Bulb Cost Percentage |
Design Type |
Replaceable? |
|---|---|---|---|
|
Small Garden Lights |
~5% of total cost |
Integrated |
Often Not |
|
Medium Commercial Lamps |
~10% of total cost |
Integrated/Modular |
Sometimes |
|
Large Streetlights |
~15% of total cost |
Modular |
Usually |
From my experience, the feasibility depends heavily on the light’s design. With small garden lights, the LED is often integrated directly into the circuit board, making replacement impractical. For medium- or large-scale projects—such as streetlights—the design is usually modular. If the solar panel, battery, and housing are intact, it is a good move to replace the LED module rather than buy a brand-new system.
I worked on a commercial lighting project where replacing the entire fixture would have been five times more expensive. The LEDs were failing, so we replaced the modular light engines and restored 100% of the original brightness. This process took one afternoon on-site with a small crew. The property manager was happy because they had saved money, and the tenants had bright, fully functional lights again. That is a strong demonstration of why modular LED replacement is a sensible option.
Environmental Benefits of Replacing LED Bulbs
Replacing only the LED bulb helps reduce unnecessary waste. Throwing away an entire solar light or a large streetlight means discarding materials that remain functional. By reusing the fixture and installing a new LED module, we minimize landfill impact and extend the product’s lifespan. This approach aligns well with the overall goal of green solutions. Solar energy is not just about generating clean power; it is also about smart maintenance and resourceful planning.
My approach at SIGOlight
At Sigolight, we often encourage clients to evaluate the design of their existing systems. We offer guidance on selecting a compatible LED module and provide quick proposals. Because I have managed hundreds of projects, I know how to optimize both cost and performance. I enjoy giving clients multiple options, which helps them pick a solution that fits their budget and local market.
We have assisted clients in North America, Europe, Southeast Asia, and Africa. They typically come to us with aging solar lights where only the LED has failed. After a quick module replacement, their lights shine again for years. That is proof that LED replacement makes a lot of sense in almost every region, provided the fixture is designed for it.
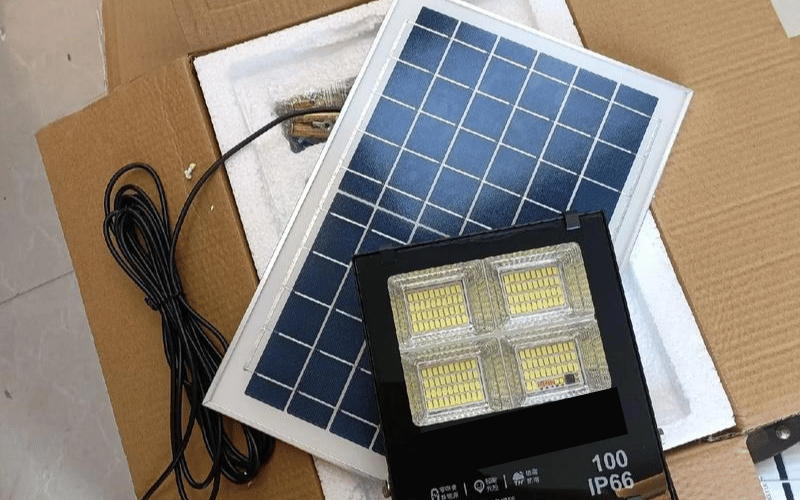
What to Consider When Replacing LED Bulbs in Solar Lights
I remember a time when a client of mine tried to replace an LED module without checking the voltage. He accidentally installed a high-voltage board on a low-voltage system, and the light barely flickered.
Check LED type, voltage, wattage, and physical size before replacement. Then seal everything to protect against water. A small detail can save a solar light from total failure.
Factors to consider when replacing solar LED bulbs
I have learned to be thorough. That means looking at the LED chip technology, the forward voltage, the total wattage rating, and physical dimensions. These details ensure compatibility and thermal management. Also, maintaining the waterproof seal is crucial to preventing moisture from creeping in. Let’s go deeper into these considerations and see how we can make the process smooth.
Identifying the right LED type
Solar lights use various LED types. Standard technologies include SMD (Surface Mounted Device) for general lighting and COB (Chip on Board) for high-intensity focus. Older or cheaper models might still use Dip LEDs. Even though I mostly see SMD-based solutions these days, I always confirm the type before I proceed. If someone uses the wrong LED configuration, the solar driver might not power it correctly, or it might overheat.
Below is a table that shows some common LED technologies and their typical characteristics:
|
LED Technology |
Typical Voltage |
Pros |
Cons |
|---|---|---|---|
|
SMD (Surface Mount) |
~3V (per chip) |
High efficiency, wide angle |
Hard to replace individually |
|
COB (Chip on Board) |
9V – 36V+ |
High intensity, focused beam |
Requires good heat sinking |
|
Dip LED (Traditional) |
2V – 3V |
Cheap, easy to find |
Low brightness, obsolete |
For larger solar streetlights, I see more use of SMD modules because of their efficiency and heat dissipation. For spot lighting, COB is sometimes used. If a client asks me for guidance, I check the existing light engine or the manufacturer’s specification sheet. Often, we can provide a direct module swap. If the client wants a different color temperature, I sometimes recommend a change, but I check if the lens optics match.
Matching voltage and wattage
Voltage mismatch is a leading cause of failure in solar lights. If a system runs on a 12V driver and a 24V LED module is installed, the light will not turn on at all. Similarly, using a lower voltage rating than the driver outputs can burn out the LEDs instantly. Double-checking the voltage is essential, even if the board physically fits.
Wattage is another factor. Wattage load is measured in watts (W). If someone picks an LED board with a much higher wattage, the solar battery might drain too quickly, leaving the light dark halfway through the night. On the other hand, if the LED’s wattage is too low, the driver might overdrive it. I usually recommend staying close to the original wattage, unless we also adjust the controller settings.
Ensuring correct dimensions
I often see installers buy a replacement LED board with the correct specs, but ignore the physical dimensions. The new board might not align with the fixture’s heat sink or screw holes. Forcing it in can cause poor thermal contact or damage the lens. That is why I measure carefully or ask the client for PCB dimension details.
Restoring waterproof integrity
Removing and replacing an LED module often involves opening the lens or cover of the solar light. That might break the factory seals. After installing the new bulb or board, I re-check the rubber gaskets or sealing foam. If necessary, I replace worn gaskets or add a layer of silicone sealant. This helps keep the compartment dry. Water damage is a hidden issue that ruins many solar devices.
Practical Tips for Replacing LED Bulbs
When I deliver proposals to clients at SIGOstreetlight, I include a simple checklist. Below is an example of what I often share:
|
Step |
Action |
Rationale |
|---|---|---|
|
1. LED Type |
Confirm SMD, COB, or other technology |
Prevent driver and thermal issues |
|
2. Voltage |
Check forward voltage vs. driver output |
Avoid damage to the LED or driver |
|
3. Wattage |
Stay near the original or adjust driver settings |
Maintain balanced energy consumption |
|
4. Physical Size |
Measure the board and the mounting hole layout |
Ensure proper fit and heat transfer |
|
5. Waterproof Check |
Re-seal housing after replacement |
Prevent moisture intrusion and failure |
I have found that following these steps usually leads to a successful replacement and extends the life of the solar lights. When a client follows this checklist, they rarely run into issues. If something unusual comes up—like a custom PCB design or a specialized LED array—we go through a more detailed analysis. But the principle remains the same: find the right LED module, install it correctly, and protect it from water.
Personal experience with replacements
In one project, a business park owner approached me to see if replacing LED modules in a batch of older pathway lights was worth the effort. The solar panels and batteries were still in great shape, but the LEDs had dimmed significantly. They used modular LED engines, so the cost to replace them was around 15% of the price of a whole new fixture. We went ahead and changed them all. We also installed new gaskets to ensure a perfect waterproof seal. Those lights are still running brightly, and the owner saved a significant amount of money.
These stories show that replacing LEDs is not complicated. It is about gathering the correct information and following the steps. I believe it is an easy way to keep a solar light working for a long time, whether it is for a home garden or a large-scale commercial project. For more solar lighting ideas, you can check SIGOstreetlight’s website.
Conclusion
Replacing LED bulbs in solar lights is a cost-effective way to extend product life and preserve performance. I see it as a practical solution for both homes and large projects where the fixture design allows for it.