The shift toward renewable energy has made solar street lights a preferred choice for municipalities, businesses, and private roadways. They offer a cost-effective, grid-independent solution that reduces long-term operational costs. However, simply purchasing high-quality solar lighting fixtures is only half the battle. The success of your lighting project depends heavily on the installation process. A poorly installed unit may experience reduced battery life, structural instability in high winds, or insufficient charging due to improper orientation.
Installing solar street lights requires precision, understanding of local environmental conditions, and adherence to structural safety standards. Unlike traditional grid-tied lights, which primarily rely on electrical trenching, solar lights rely heavily on mechanical stability and precise positioning to capture sunlight effectively. This guide walks you through the essential steps to ensure your solar street lights are installed correctly, guaranteeing longevity and optimal performance for years to come.
Installation Checklist
Before breaking ground, it is critical to have a systematic approach to the installation. Missing a step in the early stages can lead to costly rework later.
- Review the Manual: Read and understand the manufacturer’s specific instruction manual for your model.
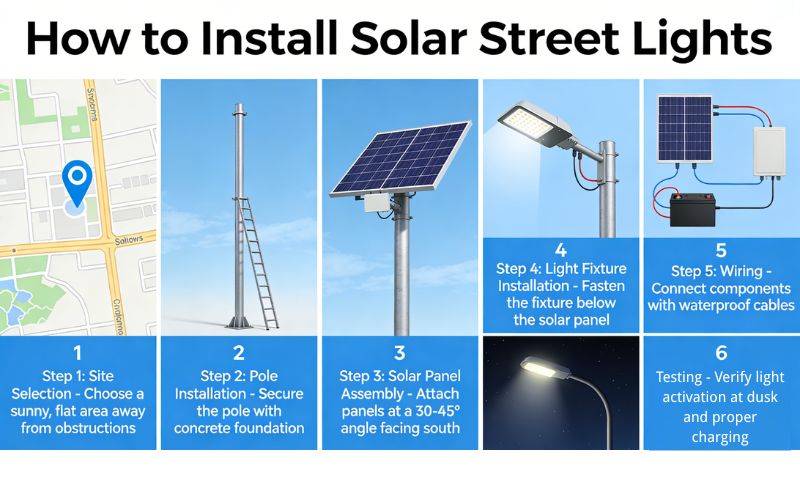
- Site Inspection: Ensure the chosen location receives direct sunlight and is free from shading by trees or tall buildings.
- Foundation Preparation: Dig the pit to the specified pole height and soil type; ensure the ground is level and free of debris.
- Cage Installation: Place the foundation cage (anchor bolts) into the pit and pour concrete.
- Curing Time: Allow the concrete to cure fully (typically 3-5 days) before mounting the pole.
- Ground Assembly: Assemble the light fixture, bracket, and solar panel on the ground before hoisting.
- Wiring Check: Connect the internal cables and verify that the connections are secure and waterproof.
- Hoisting: Safely hoist the pole onto the foundation baseplate.
- Leveling: Use a spirit level to ensure the pole is perfectly vertical; tighten anchor nuts.
- Panel Alignment: Adjust the solar panel orientation to face the equator (South in the Northern Hemisphere).
- Final Testing: Perform a system test to ensure the light turns on/off correctly.
Foundation Setup
The success to the longevity of any solar street light begins with a strong foundation. In general, the pole must be mounted on a robust baseplate and supported by a reinforced concrete foundation. The stability of the entire structure depends on this base, especially in regions prone to high winds or heavy rains.
The concrete foundation must be sufficiently strong to absorb wind-induced vibrations and provide a permanent, rigid support for the light pole. The anchor bolts are typically pre-welded into a foundation cage (often called a “J-bolt” assembly). This cage must be positioned precisely in the center of the excavated pit. Before pouring concrete, ensure the threaded ends of the bolts protrude to the height specified in your technical drawings, usually enough to accommodate the baseplate, washers, and double nuts.
The surface of the foundation must be perfectly level. While practices vary, it is essential to use a template board to keep the bolts aligned while the concrete sets. Once the concrete is poured, verify that the top surface is flat and horizontal using a precision level. Any tilt at the foundation level will result in a significantly leaning pole once the full height is reached. Allow the concrete to cure for at least 72 hours (or longer, depending on the climate) to reach maximum structural integrity before attempting to mount the heavy metal pole.
Pole and Panel Alignment
Proper alignment is critical to the equipment’s life and energy efficiency. For solar street lights, alignment refers to two distinct factors: the pole’s verticality and the solar panel’s orientation. Just as a pump shaft must be aligned to avoid wear, a solar panel must be aligned with the sun to ensure the battery is fully charged.
During the hoisting process, use a plumb bob or a long magnetic spirit level to check the pole’s vertical alignment. Adjust the leveling nuts under the baseplate to correct any lean. Once the pole is plumb, tighten the top nuts securely.
The solar panel must be oriented to capture maximum solar radiation. In the Northern Hemisphere, panels should face true South; in the Southern Hemisphere, they should face true North. The tilt angle is equally important and is usually determined by the local latitude. Improper alignment can lead to “shading losses,” in which the battery fails to complete a full charge cycle, significantly shortening the lifespan of the system components.
Proper Wiring and Connections
Both the internal wiring and external connectors should be aligned and independently supported so that the assembly doesn’t create any undesired strain against the electrical terminals. Cable strain is a leading cause of short circuits or disconnected wires inside the pole.
When connecting the components (solar panel, LED fixture, battery, and controller), follow the manufacturer’s specific sequence. Usually, the battery is connected first to wake the controller, then the solar panel and the load (light). Ensure all connectors are waterproof and securely tightened to prevent moisture ingress, a common cause of failure. Cable slack should be managed with zip ties to prevent wires from banging against the inside of the pole during windy conditions.
Pre-Startup Check and Testing
Before leaving the installation site, perform a comprehensive pre-startup check. Review the connections to verify that the positive and negative terminals are correctly matched. A reverse polarity connection can instantly damage the charge controller. Check the indicator lights on the controller; typically, specific LED patterns indicate charging status, battery health, and load status.
To test the system during daylight hours, you may need to disconnect the solar panel from the controller or cover the panel with a dark cloth or cardboard to simulate nightfall. If the installation is correct, the LED light should illuminate automatically after a few seconds. Check for proper brightness and ensure there is no flickering. Recheck the mechanical tightness of all bolts on the flange and the bracket arm to ensure nothing loosened during the hoisting process.
Common Installation Mistakes to Avoid
A second check should be performed to catch common errors that lead to premature failure. Avoid these frequent pitfalls:
- Shading: Installing the light under a tree or near a tall building that casts a shadow on the panel during peak sun hours (10 AM – 2 PM).
- Wrong Orientation: Facing the panel East or West instead of the Equator.
- Loose Connections: Failing to use waterproof tape or heat shrink on wire connections.
- Ignoring Wind Load: Using a foundation pit that is too shallow for the pole’s height.
Conclusion
Installing solar street lights is straightforward when you follow a structured checklist and engineering best practices. From pouring a solid concrete foundation to ensuring precise panel alignment, every step contributes to the lighting system’s reliability and efficiency. Taking the time to double-check wiring and stability prevents costly maintenance trips down the road.
Whether you are installing a single unit or a highway’s worth of lights, following these guidelines ensures your investment delivers bright, sustainable illumination for years. If you lack the heavy machinery for hoisting or the technical expertise for electrical connections, consulting a professional installation team is always the safest way to ensure a successful project.